Posts

Showing posts from November, 2013

Inserting gussets on a chemise

Image
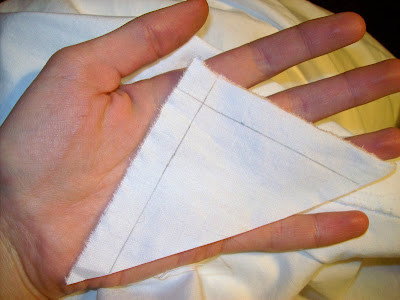
I'm currently making a 19th century chemise to use for reenacting. I just set gussets into it and want to show exactly how I did it for future reference and also to open discussion for different methods. Maybe there is a way that is easier or more effective. I welcome input! First, I cut these triangular gussets. They are four inches on each side. The lines mark the seam half an inch from each edge, wide enough to fell the seam to hide raw edges. Lines aren't necessary, but make it easier to align the gusset perfectly and also show exactly how I did this process. This is the slit into which I am inserting the gussets, cut along the grain. Notice how it is a cut slit, not an open seam. That made the process slightly more challenging since the raw edges of the slit were facing toward the gusset, in contrast to a seam, where there would be a folded edge facing the gusset. I set the gusset piece like so, right sides facing, and stitched

Wool Capes for 19th Century Reenacting

Image
 My winter ensemble This cape was a quick project before a winter living history gathering. It is made out of a coat-weight wool skirt that was already the size and shape that I wanted, so I didn’t need to cut any pieces. First, I hemmed the front edges. Next, I sewed darts on the top to fit the garment to my shoulders, and then I sewed on a collar made out of a small rectangle of wool. Total time was only 30 minutes or so. The skirt and several others like it were given to me by a friend, so my total cost was nothing. The cape is very warm and practical and makes a great layer over a paletot for Civil War reenacting. My cape Notice how the plaid does not match up at all in the front of my cape? When it was a skirt, it wasn't cut to line up. I knew this before I made the cape, but I really liked the colors. Oh well, it still looks good, just not great.  Frog closure Also, I made the collar on mine go all the way to the front edge of the cape so that the

One of my first knitting projects

Image
I just found these pictures of a scarf I knitted a few years ago for a friend. It's nothing special, but I thought it would be good to show it on my blog since I am currently getting back into knitting and trying to learn more of it. I want to be able to make really cool things like socks and hats. Knitting is beautiful; challenging yet exciting. You can do so much with it. Anyway, here is evidence of my limited skills up to this point: a simple garter-stitch scarf.

Annie's Tunic

Image
Not all of my sewing is historic in nature. I enjoy making modern garments, household items, decorative accessories, and more. Here are some photos of a comfortable cotton tunic I made for my friend Annie. We saw a similar garment in a boutique; she loved it, so I decided to surprise her by making one. I chose the fabric because it looked like a painting that Annie had made that was hanging in her kitchen. The fabric is 100% cotton, but I realized afterward that a better choice would be cotton gauze or something similarly thin, cool, and with more relaxed drape. I later made another tunic out of cotton gauze and a third out of a very drapey rayon scarf, both requested from my friends after they saw this one. It sure is delightful to sew for other people! The pattern of this garment is very simple. First, I made a rectangle large enough to fit comfortably without being a tent and long enough to hang to above the knee. Next, I roll-hemmed all four edges. Then, I cut a neck hole in

Neil's Tent: what to do when you have too much time on your hands

Image
This weekend I made a tent for my cat, Neil. He loves to sleep underneath blankets, so I've been wanting to make him a tent for a long time. I got the idea from a homemade toddler gym that was made out of hula hoops. This child's tent craft project was also inspiring: http://obsessivelystitching.blogspot.com/2010/02/tent-week-day-two-hula-hoop-dome-tent.html . I tried not to make Neil's tent very complicated; I didn't want to spend much time on it, though I did want it to look presentable as part of our living room decor. To begin, I cut a small hula hoop in half, punched holes through the middle of each piece, and wired them together to make the tent frame. Then, I measured the sides and bottom of the outside of the frame to create the pattern pieces. I made them to fit over the frame to save the trouble of sewing in loops to thread the hoops through. This method also disguises the appearance of the hula hoop; I would have covered the hoops in fabric if they were