18th Century Hunting Shirt

This hunting shirt is the first that I've tried to make. It went very well because I had help from an expert, but there were some small issues that I'd like to record for future reference. I entered this project in the Historical Sew Monthly (http://thedreamstress.com/the-historical-sew-monthly-2015/) for September, so I'll start with the information for the challenge.
The Challenge: Color Challenge Brown
Fabric:100% linen, unbleached tow linen shirting
Pattern: None--I used Neal Hurst's thesis, "Kind of armour, being peculiar to America: The American Hunting Shirt"
(https://www.academia.edu/3336557/_kind_of_armour_being_peculiar_to_America_The_American_Hunting_Shirt),
images including "The Surrender of General Burgoyne" by John Trumbull
(http://www.aoc.gov/capitol-hill/historic-rotunda-paintings/surrender-general-burgoyne),
and input from my sewing advisor.
Year: 1770's, though it can be used for about 1750-1800
Notions: 100% linen thread for hand sewing, polyester thread for machine sewing
How historically accurate is it? Pretty good, aside from the machine sewing that's not visible on the outside, so maybe 90%.
Hours to complete: About 12
First worn: In September, only for pictures.
Total cost: I'm not sure, as I did not purchase the fabric or thread, but I estimate $20-$30 U.S.

After cutting out all the pieces, the first step I took was to pleat the sleeves. I pleated them before I sewed the seam, so that it was a flat piece and easy to work with. I cut the sleeves 25" wide so that I would have 24" after sewing a 1/2" seam; 24 is easy to divide and made it easier to calculate the pleat measurements. However, the sleeves were a bit wide in the bicep area, so next time I'll try cutting 22"x22" sleeves, which is a standard size for men's shirts of the 18th century.
The pleats are tapered from the wrist to the elbow so that the sleeve is somewhat cone shaped. They are 8" around at the wrist and 16" at the elbow. The pleats begin about 1" up from the bottom edge to leave space for stroke gathering the sleeve to the cuff. I calculated for 12 pleats which are quite deep to take up all the fabric needed to make the sleeves narrow enough, but that's something else I'll do differently next time. I think it would be better to make more, smaller pleats so that there's not a drastic amount of fabric taken up in each pleat, when then needs to be spread out to do the stroke gathers at the cuffs. Furthermore, next time I'll change the finished measurements of the forearms so that they're still form fitted, but a bit looser. It fits very well on my model (thanks, Dad!), but the goal is to make a one-size-fits-most garment.
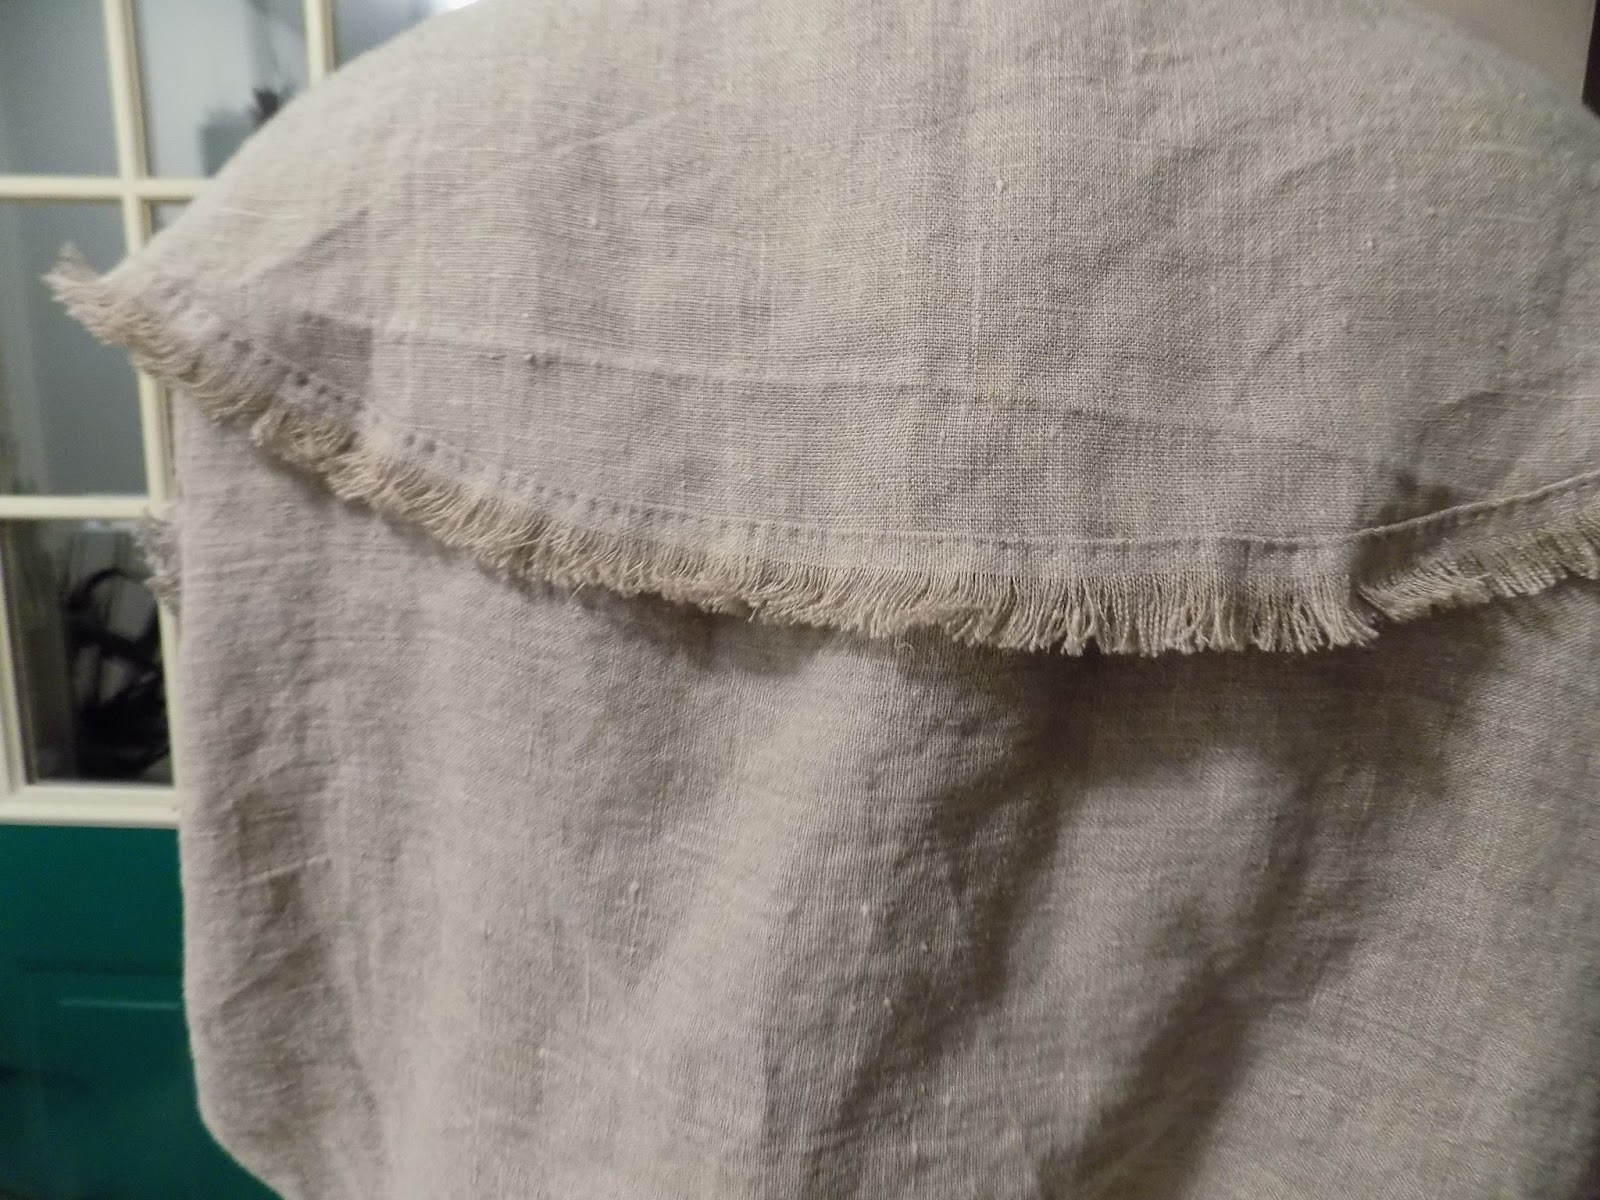
After pleating, I machine sewed all of the interior seams. The sleeve seams start about 6 inches from the cuff edge to leave a gap for the wrist opening. Then, I attached the underarm gussets. I sewed the shoulder seams and neck gussets, for which I used triangles, a 5" square cut in half--neck gussets can also consist of 5" squares folded in half, but it seems that either one is an acceptable choice. Neal Hurst's pattern drawings of the originals he studied show triangular pieces. The machine sewing is an accuracy compromise that I chose for durability and efficiency. These stitches don't show on the outside. I flat felled the seams by hand, then gathered 10" along the top of the sleeve to fit the sleeve into the armscye, matching the 10" gathered section into a 4" section at the top of the armscye. I machine sewed most of the armscye, but used hand sewing to stroke gather the top of the armscye. I attached a small facing by hand, which covers only the gathered portion of the armscye (see photo). I flat felled the rest of the armscye. I might make this facing piece go all the way around the armscye next time, since I have to flat fell the armscye anyway.
Next, I made the fringe by cutting 2" wide sections (I pulled threads to make a straight line to cut along). I realized that it's a lot easier to pull threads before pre-shrinking the fabric, so next time, I'll make the fringe first, then wash the rest of the fabric. Hopefully the fringe won't shrink much, as I won't be pre-shrinking it. I ironed the pieces in half lengthwise, then pulled threads to unravel the fabric. I could have attached the strip of fabric to the garment before pulling the threads, but I'm sure either way is fine. I used a running back stitch to sew the fringe around the armscyes, around the elbows at the top of the pleats, all around the perimeter of the bodice (front opening edges and bottom edge), and the outside edge of the cape. I noticed that Neal Hurst used a whip stitch to attach fringe on an example that he made, a picture of which is included in his thesis. I'm not sure which is better, but it probably doesn't matter since fringe was more often woven rather than made out of unraveled fabric. I did not hem the edges of the shirt bodice, but rather unraveled them slightly after attaching the fringe, to make them blend in with the fringe. This is definitely a compromise, as the originals would have been hemmed. I'm trying to make choices to allow for efficient production of this garment as a costume piece.

After attaching all the fringe, I moved on to the final step: sewing the cape to the shirt. I gathered the nape of the neck between the two neck gussets. This small amount of gathering was all that was necessary to make the shirt neckline match the length of the cape neckline. I pinned the cape onto the shirt, then machine sewed a 2" wide strip of fabric along the neckline. Then, I turned this band and hand sewed the other edge to form a narrow band collar. One of Neil Hurst's study piece originals had narrow a band collar, but I may choose to forego the band next time and attach the shirt bodice directly to the cape. I like the band collar because it makes a very neat finish and helps keep the neck from flopping down and exposing the machine stitching on the neck gussets.
You can see in the picture that the cape rides up a little bit at the nape of the neck. It's minor, but next time I make a hunting shirt, I'm going to re-draw the cape so that it has a more rounded neckline. This one is a half circle, so the neckline only turns 180 degrees. It needs to be a more curved circumference, perhaps 270 degrees or more. I'll make the neckline the same circumference of about 25", but with more curvature.
 Details of how much time this took (I should note that it took me a long time because I kept pausing to research and also lost a lot of time troubleshooting, so next time it should be under 10 hours):
Cutting: 1 hr
Pleating sleeves: 2 hrs
Machine sewing seams: 1/2 hr
Flat felling seams by hand: 1 hr
Attaching sleeves (machine sewing, stroke gathers, and felling): 1 hr
Stroke gathering sleeves to cuffs: 1 hr
Making fringe: 2 hrs
Attaching fringe: 4 hrs (probably was too fastidious with this)
Attaching cape and collar: 1/2 hr
Fabric:100% linen, unbleached tow linen shirting
Pattern: None--I used Neal Hurst's thesis, "Kind of armour, being peculiar to America: The American Hunting Shirt"
(https://www.academia.edu/3336557/_kind_of_armour_being_peculiar_to_America_The_American_Hunting_Shirt),
images including "The Surrender of General Burgoyne" by John Trumbull
(http://www.aoc.gov/capitol-hill/historic-rotunda-paintings/surrender-general-burgoyne),
and input from my sewing advisor.
Year: 1770's, though it can be used for about 1750-1800
Notions: 100% linen thread for hand sewing, polyester thread for machine sewing
How historically accurate is it? Pretty good, aside from the machine sewing that's not visible on the outside, so maybe 90%.
Hours to complete: About 12
First worn: In September, only for pictures.
Total cost: I'm not sure, as I did not purchase the fabric or thread, but I estimate $20-$30 U.S.

After cutting out all the pieces, the first step I took was to pleat the sleeves. I pleated them before I sewed the seam, so that it was a flat piece and easy to work with. I cut the sleeves 25" wide so that I would have 24" after sewing a 1/2" seam; 24 is easy to divide and made it easier to calculate the pleat measurements. However, the sleeves were a bit wide in the bicep area, so next time I'll try cutting 22"x22" sleeves, which is a standard size for men's shirts of the 18th century.

The pleats are tapered from the wrist to the elbow so that the sleeve is somewhat cone shaped. They are 8" around at the wrist and 16" at the elbow. The pleats begin about 1" up from the bottom edge to leave space for stroke gathering the sleeve to the cuff. I calculated for 12 pleats which are quite deep to take up all the fabric needed to make the sleeves narrow enough, but that's something else I'll do differently next time. I think it would be better to make more, smaller pleats so that there's not a drastic amount of fabric taken up in each pleat, when then needs to be spread out to do the stroke gathers at the cuffs. Furthermore, next time I'll change the finished measurements of the forearms so that they're still form fitted, but a bit looser. It fits very well on my model (thanks, Dad!), but the goal is to make a one-size-fits-most garment.
 | |
| Interior view of underarm gusset |
After pleating, I machine sewed all of the interior seams. The sleeve seams start about 6 inches from the cuff edge to leave a gap for the wrist opening. Then, I attached the underarm gussets. I sewed the shoulder seams and neck gussets, for which I used triangles, a 5" square cut in half--neck gussets can also consist of 5" squares folded in half, but it seems that either one is an acceptable choice. Neal Hurst's pattern drawings of the originals he studied show triangular pieces. The machine sewing is an accuracy compromise that I chose for durability and efficiency. These stitches don't show on the outside. I flat felled the seams by hand, then gathered 10" along the top of the sleeve to fit the sleeve into the armscye, matching the 10" gathered section into a 4" section at the top of the armscye. I machine sewed most of the armscye, but used hand sewing to stroke gather the top of the armscye. I attached a small facing by hand, which covers only the gathered portion of the armscye (see photo). I flat felled the rest of the armscye. I might make this facing piece go all the way around the armscye next time, since I have to flat fell the armscye anyway.
 | |
| Armscye facing at stroke gathers |
Next, I made the fringe by cutting 2" wide sections (I pulled threads to make a straight line to cut along). I realized that it's a lot easier to pull threads before pre-shrinking the fabric, so next time, I'll make the fringe first, then wash the rest of the fabric. Hopefully the fringe won't shrink much, as I won't be pre-shrinking it. I ironed the pieces in half lengthwise, then pulled threads to unravel the fabric. I could have attached the strip of fabric to the garment before pulling the threads, but I'm sure either way is fine. I used a running back stitch to sew the fringe around the armscyes, around the elbows at the top of the pleats, all around the perimeter of the bodice (front opening edges and bottom edge), and the outside edge of the cape. I noticed that Neal Hurst used a whip stitch to attach fringe on an example that he made, a picture of which is included in his thesis. I'm not sure which is better, but it probably doesn't matter since fringe was more often woven rather than made out of unraveled fabric. I did not hem the edges of the shirt bodice, but rather unraveled them slightly after attaching the fringe, to make them blend in with the fringe. This is definitely a compromise, as the originals would have been hemmed. I'm trying to make choices to allow for efficient production of this garment as a costume piece.

After attaching all the fringe, I moved on to the final step: sewing the cape to the shirt. I gathered the nape of the neck between the two neck gussets. This small amount of gathering was all that was necessary to make the shirt neckline match the length of the cape neckline. I pinned the cape onto the shirt, then machine sewed a 2" wide strip of fabric along the neckline. Then, I turned this band and hand sewed the other edge to form a narrow band collar. One of Neil Hurst's study piece originals had narrow a band collar, but I may choose to forego the band next time and attach the shirt bodice directly to the cape. I like the band collar because it makes a very neat finish and helps keep the neck from flopping down and exposing the machine stitching on the neck gussets.
 |
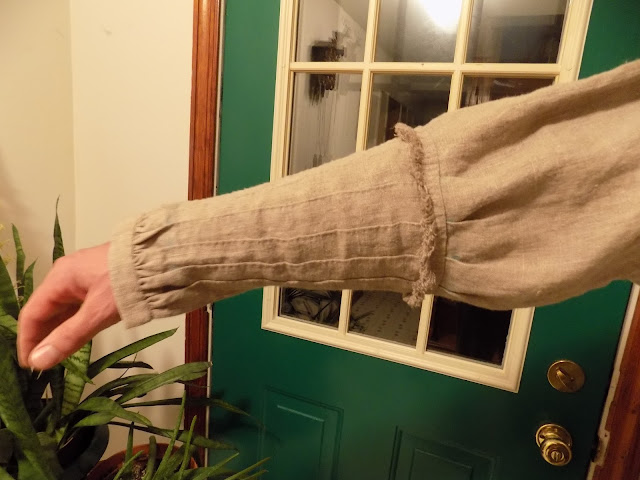
| "I remember when you were thiiiiis tall!" jklol |
You can see in the picture that the cape rides up a little bit at the nape of the neck. It's minor, but next time I make a hunting shirt, I'm going to re-draw the cape so that it has a more rounded neckline. This one is a half circle, so the neckline only turns 180 degrees. It needs to be a more curved circumference, perhaps 270 degrees or more. I'll make the neckline the same circumference of about 25", but with more curvature.
 Details of how much time this took (I should note that it took me a long time because I kept pausing to research and also lost a lot of time troubleshooting, so next time it should be under 10 hours):
Cutting: 1 hr
Pleating sleeves: 2 hrs
Machine sewing seams: 1/2 hr
Flat felling seams by hand: 1 hr
Attaching sleeves (machine sewing, stroke gathers, and felling): 1 hr
Stroke gathering sleeves to cuffs: 1 hr
Making fringe: 2 hrs
Attaching fringe: 4 hrs (probably was too fastidious with this)
Attaching cape and collar: 1/2 hr


Comments
Post a Comment