Red's Square-Cut Shirt
I have a good friend who is a Civil War reenactor, like me. He asked me to make a basic shirt for him using a sheet. It's a printed cotton/polyester blend. The printed plaid is very close to the grainline, but not quite, so the plaid looks crooked in some places. I cut most of the pieces following the grain of the fabric, not the printed lines. I am entering this project in The Historical Sew Monthly (http://thedreamstress.com/the-historical-sew-monthly-2015/). Here's the finished product:

This shirt is the basic square-cut type used for many centuries in Western cultures, with certain features typical of the mid 1800's. I referred to "1850's Civil War Men's Shirt Pattern" at http://worldturndupsidedown.blogspot.com/2012/10/1850s-mens-shirt-pattern.html and "Making a Shirt" at https://teainateacup.wordpress.com/2012/04/28/my-mr-knightley-making-a-shirt/. I reduced the size of the shirt significantly to be similar to a modern XL shirt. I chose to hand-sew all visible stitching to make the shirt more historically accurate and look more plausible, but also because I knew I needed the practice. I made a lot of mistakes. I fixed the major ones, but other issues were not significant. I'll point them out with my photos because I want to take note of how it could be done better and also to show that I have a lot to learn!
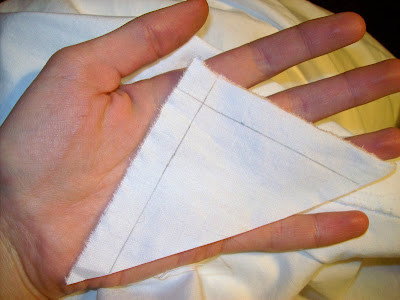
Obviously I started by cutting all the pieces. I cut the body as one big piece instead of two pieces joined with shoulder seams. Then, I cut out the neck opening and attached the neck gussets, which I chose to cut as triangles. There are different ways I could have done the neck and shoulders, but here's my approach, which may or may not be the best.
I inserted one triangle (I cut the 4" squares in half)

Then I pressed the edges of another triangle 1/4"

And whip-stitched this triangle on the inside to hide the raw edges of the first triangle

Next, I attached the rectangular shoulder bands on top of the shoulders. From what I understand, these could be on the inside, but I used to make this style of shirt for a living history museum and I was taught to sew the bands on the outside. Because this fabric (50% cotton/50% polyester) does not stretch at all, I couldn't get the shoulder bands to lay smoothly over the non-flat shoulder and triangular gussets. But it looks good enough.

 My next step was to attach rectangles to form the placket, which differs from the instructions I used, but I usually see plackets on Civil War shirts. I'm not sure about this style point. Did I do it right? Were plackets common in the 1860's? Anyway, I machine sewed one rectangular placket piece to each side of the front opening, pressed it over, and hand back-stitched them down.
 Then, I lapped the two plackets and sewed a square and an X to hold them in place.
 Subsequently, I pressed the rectangular collar and sewed its short edges. I gathered the neck opening to fit the collar, machine stitched one side, folded the collar to the inside, and whip stitched the inside edge.
 After that, I attached the underarm gussets and cuffs to the sleeves, finishing the sleeve seams before attaching them to the shirt at the armscye. I did not gather the top of the sleeves because it would have made the armscyes too small. If I want to make gathered sleeves in the future, I'll have to cut them wider.


I sewed the rest of the side seams and flat felled all of them. I flat felled the shoulder seams and then realized that I forgot to sew in the rectangular shoulder binders, which would have covered the raw edges at the armscye, but the flat-felling was so nice that I didn't want to un-pick it. So I left it as it was and did not attach the binders. Oops. I also don't like the way I finished the underarm gussets. It would be better to press these gusset seams outward, then I would have to clip a bit where the body seam folds in the other direction.
 I made that same mistake on the gussets in the bottom of the side seams. Also, these gussets were unnecessary since I shortened the shirt so much.

I rolled the lower hem 1/2" and whip stitched it.

All of the buttonholes are hand-sewn using silk buttonhole cording. I used shell buttons.


I just mailed the shirt to Red. It was great practice for me and I didn't have to worry too much since the fabric was not new. It's amazing how basic and efficient the square-cut style is. The assembly is simple, but I'm not a professional, so it took a lot of careful consideration. I hope it holds up well in battle!
The Challenge: May, Practicality
Fabric: 50% cotton, 50% polyester bedsheet
Pattern: "1850's Civil War Men's Shirt Pattern" at http://worldturndupsidedown.blogspot.com/2012/10/1850s-mens-shirt-pattern.html
Year: early 1860's
Notions: thread, buttons
How historically accurate is it? Mostly. The fabric is not accurate, but looks like it is. I took shortcuts with construction and also made some errors in assembly.
Hours to complete: 6
First worn: Hopefully this month :)
Total cost: Red found the sheet in his linen closet. The thread was free (given to me). Not sure where the buttons came from, but probably from a flea market box, so negligible cost. Basically a few cents total.
This shirt is the basic square-cut type used for many centuries in Western cultures, with certain features typical of the mid 1800's. I referred to "1850's Civil War Men's Shirt Pattern" at http://worldturndupsidedown.blogspot.com/2012/10/1850s-mens-shirt-pattern.html and "Making a Shirt" at https://teainateacup.wordpress.com/2012/04/28/my-mr-knightley-making-a-shirt/. I reduced the size of the shirt significantly to be similar to a modern XL shirt. I chose to hand-sew all visible stitching to make the shirt more historically accurate and look more plausible, but also because I knew I needed the practice. I made a lot of mistakes. I fixed the major ones, but other issues were not significant. I'll point them out with my photos because I want to take note of how it could be done better and also to show that I have a lot to learn!
Obviously I started by cutting all the pieces. I cut the body as one big piece instead of two pieces joined with shoulder seams. Then, I cut out the neck opening and attached the neck gussets, which I chose to cut as triangles. There are different ways I could have done the neck and shoulders, but here's my approach, which may or may not be the best.
I inserted one triangle (I cut the 4" squares in half)
Then I pressed the edges of another triangle 1/4"
And whip-stitched this triangle on the inside to hide the raw edges of the first triangle
Next, I attached the rectangular shoulder bands on top of the shoulders. From what I understand, these could be on the inside, but I used to make this style of shirt for a living history museum and I was taught to sew the bands on the outside. Because this fabric (50% cotton/50% polyester) does not stretch at all, I couldn't get the shoulder bands to lay smoothly over the non-flat shoulder and triangular gussets. But it looks good enough.
I sewed the rest of the side seams and flat felled all of them. I flat felled the shoulder seams and then realized that I forgot to sew in the rectangular shoulder binders, which would have covered the raw edges at the armscye, but the flat-felling was so nice that I didn't want to un-pick it. So I left it as it was and did not attach the binders. Oops. I also don't like the way I finished the underarm gussets. It would be better to press these gusset seams outward, then I would have to clip a bit where the body seam folds in the other direction.
I rolled the lower hem 1/2" and whip stitched it.
All of the buttonholes are hand-sewn using silk buttonhole cording. I used shell buttons.
I just mailed the shirt to Red. It was great practice for me and I didn't have to worry too much since the fabric was not new. It's amazing how basic and efficient the square-cut style is. The assembly is simple, but I'm not a professional, so it took a lot of careful consideration. I hope it holds up well in battle!
The Challenge: May, Practicality
Fabric: 50% cotton, 50% polyester bedsheet
Pattern: "1850's Civil War Men's Shirt Pattern" at http://worldturndupsidedown.blogspot.com/2012/10/1850s-mens-shirt-pattern.html
Year: early 1860's
Notions: thread, buttons
How historically accurate is it? Mostly. The fabric is not accurate, but looks like it is. I took shortcuts with construction and also made some errors in assembly.
Hours to complete: 6
First worn: Hopefully this month :)
Total cost: Red found the sheet in his linen closet. The thread was free (given to me). Not sure where the buttons came from, but probably from a flea market box, so negligible cost. Basically a few cents total.

Love it! Thanks for linking to me!
ReplyDeleteDiscover Irish Connexxion India, your ultimate destination for men printed clothes manufacturer in India. Their extensive range of stylish and high-quality designs perfectly captures the essence of Indian textiles. Whether you're looking for casual tees or sophisticated shirts, Irish Connexxion India excels in offering top-notch craftsmanship and trendy prints. Explore their collection today to elevate your wardrobe with authentic Indian flair!
ReplyDeleteThanks for Sharing!
ReplyDeleteLooking for the perfect everyday essential? Plain shirts for men are a must-have. From a crisp plain white shirt to a sleek plain black shirt, these timeless pieces offer effortless style and versatility. Whether you're dressing up or keeping it casual, plain shirts keep your look sharp and simple. Start building your wardrobe with these classic staples today!