Inserting gussets on a chemise
I'm currently making a 19th century chemise to use for reenacting. I just set gussets into it and want to show exactly how I did it for future reference and also to open discussion for different methods. Maybe there is a way that is easier or more effective. I welcome input!
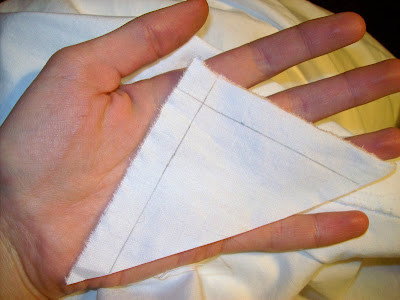
First, I cut these triangular gussets. They are four inches on each side. The lines mark the seam half an inch from each edge, wide enough to fell the seam to hide raw edges. Lines aren't necessary, but make it easier to align the gusset perfectly and also show exactly how I did this process.
This is the slit into which I am inserting the gussets, cut along the grain. Notice how it is a cut slit, not an open seam. That made the process slightly more challenging since the raw edges of the slit were facing toward the gusset, in contrast to a seam, where there would be a folded edge facing the gusset.

I set the gusset piece like so, right sides facing, and stitched the extreme point of the slit to the intersection point of the seam lines on the gusset.

Next, I started to align the seam.

I pinned the seam so that the gusset and the slit edge were at a slight angle. I wanted the gusset edge to extend a quarter inch because it would be rolled over the slit edge when finishing the edges.

Here you can see the finished seam and how it is sewn at an angle.
Subsequently, I cut a small slit at the acute corners of each gusset so that the seams could be felled without pulling a little pucker in the fabric. This cut also trims off the corners at a right angle to the straight grain.

See? Now the rolled/felled seam can fold neatly.

My next step was to fold the edges of the gusset and pin them into place so I could fell the seams.
Finally, I sewed this little bit of reinforcement in the corner of the gusset showing on the outside. These buttonhole stitches are not necessary, but I wanted to make sure the raw edge of the slit was completely covered and secured.
I had never sewn this type of gusset before and wanted to make sure I did a nice job on it. I experimented a bit until I came up with the technique shown in this post. Silly me, I could have researched it--but, I'm glad I just made myself figure it out with simple geometry and common sense. I waste too much time reading about sewing on the Internet when I could be actually sewing instead. I would appreciate any advice or instructions!
UPDATE:
La Cotte Simple has an outstanding tutorial on setting gores or gussets into slit fabric: http://cottesimple.com/tutorials/gore-in-slit-fabric/
It is important to note the difference between setting a gore into a slit and setting a gore into a seam. They are different! Here is a tutorial for setting a gore/gusset into a seam: http://thefibrequeen.blogspot.com/2013/02/as-promised-heres-my-how-to-on-smooth.html
First, I cut these triangular gussets. They are four inches on each side. The lines mark the seam half an inch from each edge, wide enough to fell the seam to hide raw edges. Lines aren't necessary, but make it easier to align the gusset perfectly and also show exactly how I did this process.

This is the slit into which I am inserting the gussets, cut along the grain. Notice how it is a cut slit, not an open seam. That made the process slightly more challenging since the raw edges of the slit were facing toward the gusset, in contrast to a seam, where there would be a folded edge facing the gusset.

I set the gusset piece like so, right sides facing, and stitched the extreme point of the slit to the intersection point of the seam lines on the gusset.

Next, I started to align the seam.

I pinned the seam so that the gusset and the slit edge were at a slight angle. I wanted the gusset edge to extend a quarter inch because it would be rolled over the slit edge when finishing the edges.

Here you can see the finished seam and how it is sewn at an angle.
 |
| Showing the slit on top of the gusset |
 |
| Reverse, showing the gusset on top of the slit. Gusset overlaps a quarter inch. |
Subsequently, I cut a small slit at the acute corners of each gusset so that the seams could be felled without pulling a little pucker in the fabric. This cut also trims off the corners at a right angle to the straight grain.

See? Now the rolled/felled seam can fold neatly.

My next step was to fold the edges of the gusset and pin them into place so I could fell the seams.
 |
| Pinned |
 |
| Felling the seam |
 |
| Finished felling on the inside of the chemise |
 |
| Right side of the felling |
Finally, I sewed this little bit of reinforcement in the corner of the gusset showing on the outside. These buttonhole stitches are not necessary, but I wanted to make sure the raw edge of the slit was completely covered and secured.
 |
| Buttonhole stitches securing the corner |
I had never sewn this type of gusset before and wanted to make sure I did a nice job on it. I experimented a bit until I came up with the technique shown in this post. Silly me, I could have researched it--but, I'm glad I just made myself figure it out with simple geometry and common sense. I waste too much time reading about sewing on the Internet when I could be actually sewing instead. I would appreciate any advice or instructions!
UPDATE:
La Cotte Simple has an outstanding tutorial on setting gores or gussets into slit fabric: http://cottesimple.com/tutorials/gore-in-slit-fabric/
It is important to note the difference between setting a gore into a slit and setting a gore into a seam. They are different! Here is a tutorial for setting a gore/gusset into a seam: http://thefibrequeen.blogspot.com/2013/02/as-promised-heres-my-how-to-on-smooth.html


That is a very nicely done tutorial on how you did your gusset. Thank you.
ReplyDeleteThank you, Tracey!
Delete